Sometimes when we take pictures of colored objects, the color we see in the picture is different from the actual color of the object as we perceive it. The RGB values of an image is determined from the integral of the product of surface reflectance of the object, the spectral power distribution of the light source and the camera sensitivities and this is divided by the white balancing constant. It is due to this constant that white objects should appear white in the image.
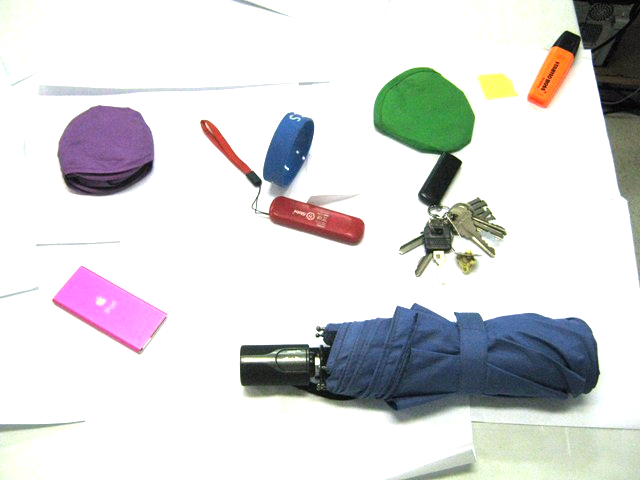
Most cameras have white balancing options such as: daylight, cloudy, tungsten, fluorescent and incandescent and the names pertain to the type of light source illuminating the object. We are first asked to take images of an ensemble of objects with colors representing major hues under a fixed light source and using different white balancing settings. I used BA Racoma’s Canon Powershot A480 camera with white balancing settings: daylight, cloudy, tungsten, fluorescent, and fluorescent_H. The objects used include: red USB, orange highlighter, yellow piece of paper, green fan sleeve, blue baller, indigo ipod, violet fan sleeve, purplish blue umbrella and a black USB. They were taken with a white background and under a fluorescent lamp.

Image taken under "daylight" white-balancing setting

Image taken under "cloudy" white-balancing setting
 Image taken under "tungsten" white-balancing setting
 Image taken under "fluorescent" white-balancing setting
 Image taken under "fluorescent_H" white-balancing setting
Shown above are the images taken with daylight, cloudy, tungsten, fluorescent and fluorescent_H white balancing setting. Under daylight, the image looks a bit more bluish while under cloudy, the image looks a bit… brownish. Fluorescent_H is almost like cloudy except that it looks more brownish or reddish. The image under the tungsten setting looks bluish since light from tungsten is very orange compared to daylight; the bluish white-balancing balances the orange tinge due to the tungsten bulb. The image looks best in fluorescent setting since the white background looks the whitest there.
We’ll try to white balance the wrongly balanced images. There are two methods of doing this: White Patch algorithm and Gray World algorithm. In White Patch algorithm we divide the RGB values of the image by the RGB values of a pixel from the image that we know is white respectively. Pixel values greater than 1 are clipped to 1. In Gray World algorithm, we take the averages of the R, G and B of the image and then use it as the divisor for RGB respectively. The white-balanced images are now:

white-balanced (daylight) using White Patch algorithm

white-balanced (daylight) using Gray World algorithm

white-balanced (cloudy) using White Patch algorithm
white-balanced (cloudy) using Gray World algorithm

white-balanced (tungsten) using White Patch algorithm

white-balanced (tungsten) using Gray World algorithm

white-balanced (fluorescent_H) using White Patch algorithm

white-balanced (fluorescent_H) using Gray World algorithm
Wow!! White does really appear white here! It seems that as if a color overlay has been removed from the images and they now look brighter. The colors of the image became brighter and more vivid. Also, in the white-balanced images using the White Patch algorithm, I noticed that the area near the chosen pixel of a white object seems to be whiter or more saturated than the rest of the white background. Images that used the Gray World algorithm, meanwhile, appear more saturated. Perhaps this is because the majority of the pixels are white and thus when the average of the RGB values is taken and divided in their planes respectively, the image looks saturated.
Next we took another picture of an ensemble of objects having the hue along with a white object under a white-balancing setting that is not appropriate for the light source. In this case I used the tungsten setting and took the picture under the illumination of a fluorescent lamp. We then apply the White Patch algorithm and the Gray World algorithm independently and the results are:

Image taken under "tungsten" white-balancing setting

white-balanced using white patch algorithm

white-balanced using gray world algorithm
Aside from this BA Racoma played around with the custom white-balancing setting and took a picture of me with a deliberately wrong setting. So I applied the two algorithms once again and…
 wrongly balanced image
 balanced using white patch algorithm
 balanced using gray world algorithm
To grade myself, I give a 10/10 for understanding the lesson and producing the outputs required in this activity.
Score: 10/10
Lastly I would like to acknowledge Dr. Soriano and BA Racoma for the helpful discussions. Also, thanks to Mayanne Tenorio, Tisza Trono and BA Racoma for the materials used inthis activity.
References:
1. M. Soriano, "A12 - Color Camera Processing"
Appendix: (code)
// AP186 Color camera processing
// White patch algorithm
A = imread("C:\fluorescent_H.JPG");
R = A(:, :, 1);
G = A(:, :, 2);
B = A(:, :, 3);
// RGB values of pixel belonging to white
Rw = R(270, 160);
Gw = G(270, 160);
Bw = B(270, 160);
Rbal = R / Rw;
Gbal = G / Gw;
Bbal = B / Bw;
Rbal(find(Rbal > 1)) = 1;
Gbal(find(Gbal > 1)) = 1;
Bbal(find(Bbal > 1)) = 1;
A(:, :, 1) = Rbal;
A(:, :, 2) = Gbal;
A(:, :, 3) = Bbal;
imwrite(A, "C:\fluorescent_H_white_patch.PNG");
//imshow(A);
//Gray world algorithm
A = imread("C:\fluorescent_H.JPG");
R = A(:, :, 1);
G = A(:, :, 2);
B = A(:, :, 3);
// Get average value for R, G and B planes
Rw = mean(R);
Gw = mean(G);
Bw = mean(B);
Rbal = R / Rw;
Gbal = G / Gw;
Bbal = B / Bw;
Rbal(find(Rbal > 1)) = 1;
Gbal(find(Gbal > 1)) = 1;
Bbal(find(Bbal > 1)) = 1;
A(:, :, 1) = Rbal;
A(:, :, 2) = Gbal;
A(:, :, 3) = Bbal;
//imshow(A);
imwrite(A, "C:\fluorescent_H_gray_world.PNG");
---------------- end ----------------------
Ganda nung picture mo sa white patch. Pangprofile pic na!
ReplyDelete